Activating and managing your REST channel in Chaman
Chaman (Channel Management) is an online service for activating and configuring various technical channels associated with Social Security services.
Depending on the type of service to be integrated, the appropriate configuration must first be carried out in Chaman. In particular, for the integration of a REST service, configuring the REST channel is necessary.
Prerequisites
Before you can access the Chaman online service, some preliminary actions must be completed by a legal representative of the company.
Prerequisite 1 Register your company on the Social Security portal
To use the Social Security online services, your company must be registered with the NSSO.
For this, please follow the instructions provided on the following page: Initial registration on Social Security portal (FR) /
Initial registration on Social Security portal (NL)
Prerequisite 2 Appoint a primary access manager for your company
After registering your company, you must appoint a Chief Access Manager. This person will be responsible for granting access to various Social Security portal online services to your company's employees.
For this, please follow the instructions available on the following page, in the section ‘I want to handle my administrative obligations to the NSSO myself’: Appointing a Chief Access Manager (FR) /
Appointing a Chief Access Manager (NL)
Prerequisite 3 Appoint a person as the technical manager for channel management in Chaman (optional)
If desired, an Access Manager of your company can grant an employee of your IT department access to the Chaman online service. This allows delegating the configuration of your company's technical channels to those responsible for integrating the associated services into your IT system.
To do this, you must go to the access management online service and assign Chaman access authorization to the relevant persons. The Access Management online service is available via the following link: Access Management online service (FR) / Access Management online service (NL)
Activate and configure the REST channel in Chaman
Activating the REST channel for your company requires uploading an X.509 authentication certificate that identifies your company or your client application. It is therefore necessary to have obtained this certificate prior to Chaman configuration.
Obtain an authentication certificate for your company
To secure the calls made by your application on the REST APIs, you must have an authentication certificate in your company's name. Several options are available to you:
-
You can generate and use a self-signed certificate in your company's name. Please comply with the following constraints when creating your self-signed certificate:
Constraint Allowed values Key pair generation algorithm RSA or EC Key size (bits) For RSA: 2048, 3072, or 4096.
For EC: P-384 or P-521Digest algorithm associated with certificate signature SHA-256, SHA-384, or SHA-512 Certificate key usage Digital Signature infoAt this stage, if you wish, you can also appoint a social secretariat or a provider of similar services to handle your company's administrative obligations. This is optional and not necessary for the integration of a new REST service. -
You can order this certificate from a recognized certification authority (e.g., GlobalSign, DigiCert, QuoVadis, Verisign, Certipost, etc.).
infoIf your company already has a certificate, you can of course reuse it.
The same certificate can be used for the configuration of different channels or REST accounts in Chaman.
Configure the REST channel in Chaman
To proceed with the activation of the REST channel and the configuration of your authentication certificate, please log in to Chaman on behalf of your company. Access to the Chaman online service is available from the following page: Chaman, technical channel management (FR) / Chaman, technical channel management (NL)
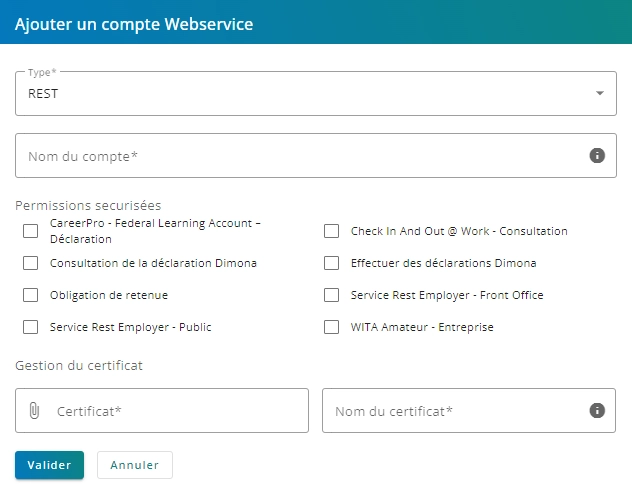
In Chaman, in the section associated with web service channels, please click on the ‘Add a Web service account’ button. Then, complete the form (pictured below) as follows:
- Choose the REST type. Once selected, the associated fields list will appear.
- Enter the name you want to give to your REST account.
- Choose the permissions you wish to assign to this account. The permissions granted to this account give access to the corresponding REST APIs.
- Upload the authentication certificate that will be used by your REST client. You must specify a name for this certificate.
- Finally, press the ‘Validate’ button to confirm the creation of the REST account.
At the end of this step, the OAuth Client ID associated with this account will be displayed. This Client ID takes the form ‘self_service_expeditor_X’ (where X is the unique identifier assigned to this configuration).